Single Sign On via Generic SAML
Note: Single Sign On is available as part of the Advanced Security add-on.
Enchant supports Single Sign On (SSO) via SAML 2.0. Enchant takes the role of a Service Provider (SP) and can integrate with a third party that takes the role of an Identity Provider (IdP).
In this article, we describe the high level steps that are required to enable Single Sign On via a generic SAML Identity Provider.
To configure SAML, there is some information that will need to be copied from Enchant to your Identity Provider and some information that will need to be copied back into Enchant. Unfortunately there are no accepted conventions for how identity providers name the fields, so we've tried to provide alternate terminology in the descriptions below.
- 1
The Identity Provider will allow you to Single Sign On to any number of applications configured within their system.
In the Identity Provider's system, add a generic SAML capable application and name it Enchant.
- 2
In the Identity Provider's system, assign users to the new Enchant application. This will give them those users access to Single Sign On to Enchant through the provider.
- 3
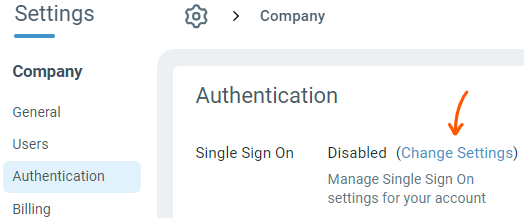
Go to Enchant's authentication settings page (Settings -> Company -> Authentication) and click the Enable SSO link to open the SSO details page.
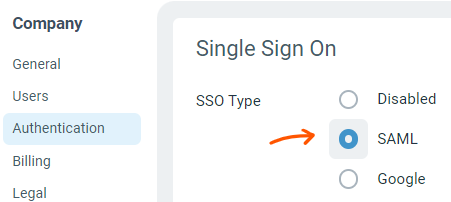
On the details page, check the SAML option beside the SSO Type field.
- 4
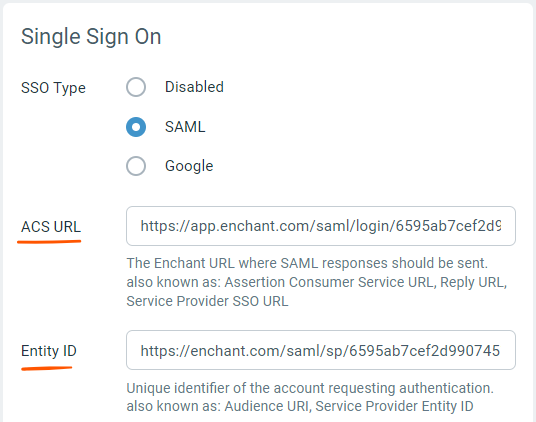
Copy the following fields to the Identity Provider:
ACS URL: The Enchant URL where the Identity Provider will send responses to SAML authentication requests. Also known as Assertion Consumer Service URL, Reply URL, Service Provider SSO URL.
Entity ID: Unique identifier of the entity requesting authentication. Also known as Audience URI, Service Provider Entity ID.
Setup the SAML configuration to send the following assertions:
email: email address to authenticate (required)
first_name: first name of the user being authenticated (optional)
last_name: last name of the user being authenticated (optional)
- 5
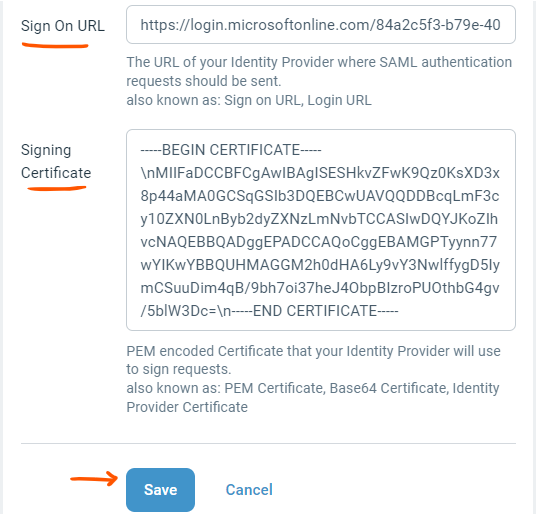
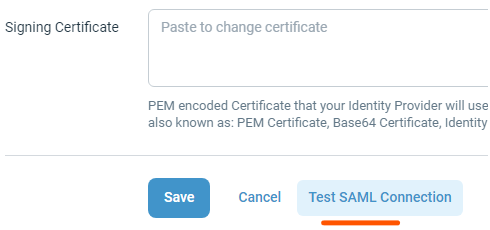
Copy the following information back into the Enchant authentication settings page:
Sign On URL: The URL of your Identity Provider where SAML authentication requests should be sent. Also known as Login URL, Identity Provider SAML URL.
Signing Certificate: PEM encoded Certificate that your Identity Provider will use to sign requests. Also known as: PEM Certificate, Base64 Certificate, Identity Provider Certificate.
Finally, click Save to complete the SSO (SAML) setup in Enchant.
- 6
After you save SAML settings, you can test the connection using the Test SAML Connection button on the SAML settings page in Enchant:
This will guide you through a test process where you'll be sent to Azure Entra ID for authentication in a new tab. If you get back into Enchant in the new tab via redirect from Entra ID, then the connection process was successful.